|
|
|
 |
 |
| Splash screens for Windows 7 and Windows XP. Despite Microsoft's claims, it is NOT a slam dunk to get these two popular versions of Windows to share files and peripherals on a simple wireless home network. The following Nine-Point Checklist will get up and running with a mixed Windows 7 / Windows XP wireless network. | |
|
WHAT A HOOT! Seriously. OK, it's 2010 and what's the MOST common networking scenario that people with new, whiz-bang Windows 7 PCs are likely to encounter? Well, considering that the majority of the Windows user base is still running three-plus-year old Windows XP, many many (as they say in Walla Walla) new Windows 7 users are likely to find themselves in a mixed Windows 7 / Windows XP network environment -- where the two versions of Windows are thrown together on the same peer-to-peer network for file and printer sharing. OK, it's still 2010, and what's the most common networking complaint concerning Microsoft's new Windows 7? You hear some griping about the new Windows 7-only Homegroup networking feature, but that's really just normal noise on the line. By far and away, the biggest Windows 7 networking problem is that it can be unbelievably difficult to get Windows 7 PCs to network with older, much more numerous Windows XP PCs. A decade ago I swore I'd never do PC software tech support again. It was a gift I gave myself. But I had to master Windows 7 and Windows XP peer-to-peer wireless networking for my own purposes, and so I'm passing on what I learned here in the form of The Windows 7 / Windows XP Wireless Home Networking Bible. This information should be in the tech support knowledge bases of Microsoft, Symantec, McAfee, Dell and HP, to mention just a few, but it's never been collected in one place until now, here. Enjoy, or as we used to say at BugNet, "may you go with foreknowledge..." Here is the Nine-Step Checklist in outline form. Click links to jump directly to the step you want, or read them in sequence...
OK, here we go...
In Windows XP, go Start > Control Panel > System Properties. Choose the Computer Name Tab. Here you'll see the Workgroup name stipulated. XP's default is MSHOME, while Windows 7's default is WORKGROUP. One this screen you'll see a button that allows you to change the name of the computer and its Workgroup. In Windows 7, go Start > Control Panel > System & Security > System. Toward the bottom of this screen you'll see the Computer Name and Workgroup listed, as well as links that allow you to change these settings. Make sure the XP and Windows 7 machines have the same Workgroup name, with exactly the same spelling and capitalization.
First go to your Windows XP machine and open Windows Explorer -- Start > All Programs > Assecories. Steer in Windows Explorer to the folder(s) you want to share. Right-click on the folder and choose Sharing & Security > Sharing tab. Tick "Share this folder on the network" and/or "Allow users to change my files," depending on the level of sharing you want to grant, and click OK. Now the icon for the folder you just shared shows a hand super-imposed on the lower portion, indicating it is a shared folder (see screen shot below). |
|
||||||||||||||||||||||||||||||||||
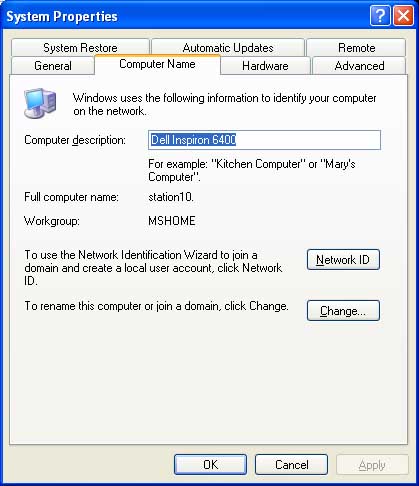 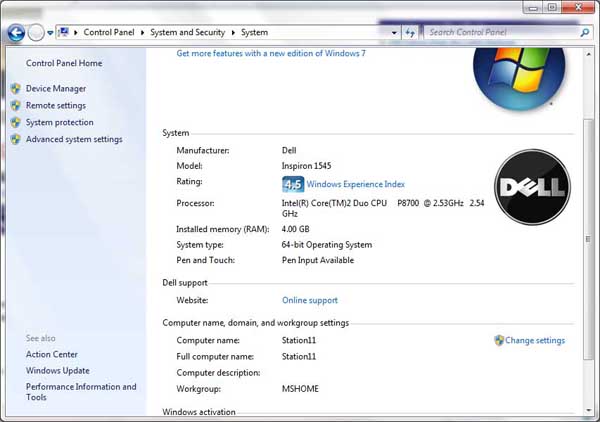 |
| Workgroup setup in Windows XP (ABOVE LEFT) and Windows 7 (ABOVE RIGHT). The Workgroup name must be identical on all Windows XP and Windows 7 machines., as shown here. |
|
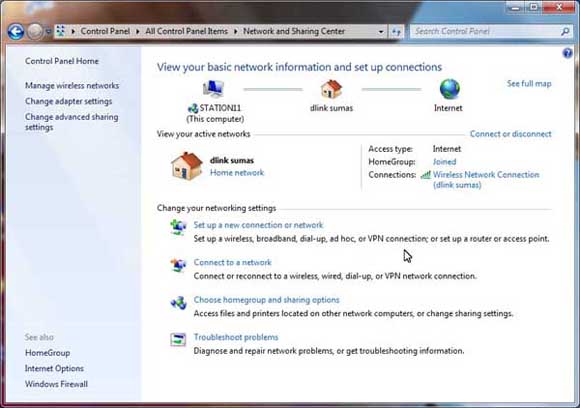
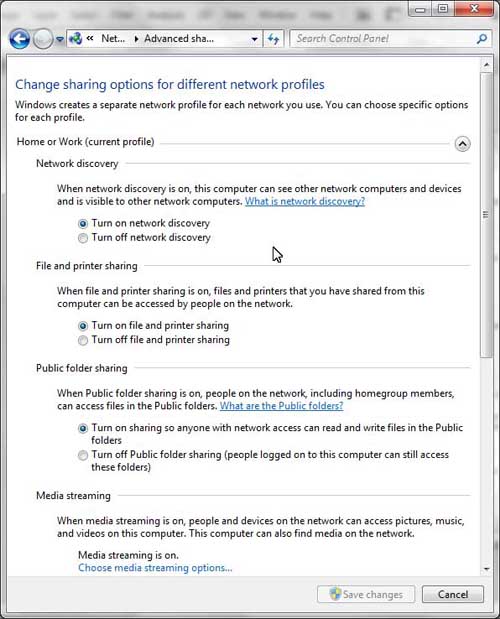
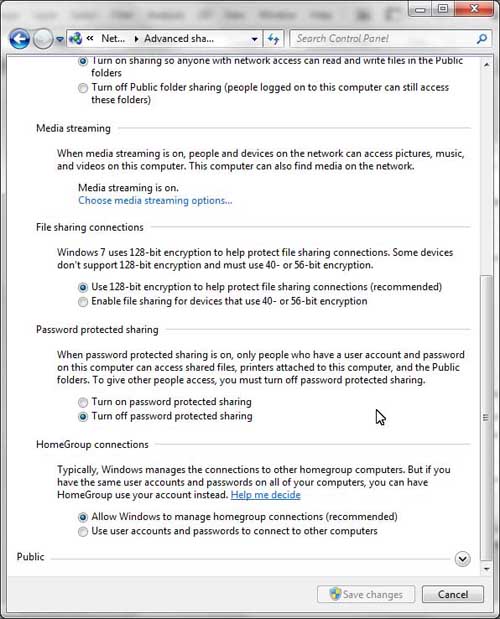
Now go to your Windows 7 machine. Click Start > Control Panel > All Control Panel Items > Network and Sharing Center > Change Advanced Sharing Settings (the location of this button is a little obscure -- it's near the top of the blue bar on the left in the column headed, "Control Panel Home" -- see pics below) and make sure you have Network Discovery, File and Printer Sharing and Public Folder Sharing all set to "On," and Password Protected Sharing to "Off" (again, see screen shots of settings below). |
||
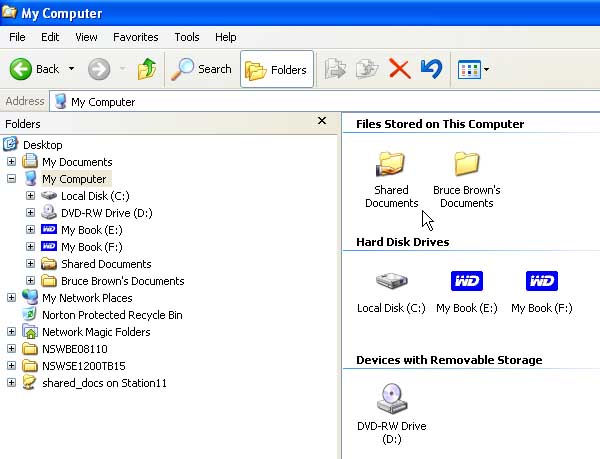 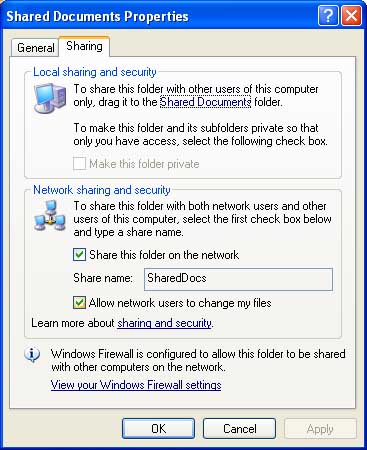 |
| File sharing in Windows XP -- folders that have been shared appear with the hand at the bottom of the folder icon (ABOVE LEFT). Right-click the folder icon in Windows Explorer > Properties > Sharing Tab to access the sharing control for folders in Windows XP, shown here set to allow read/write access to other computers in the Workgroup (ABOVE RIGHT). |
|
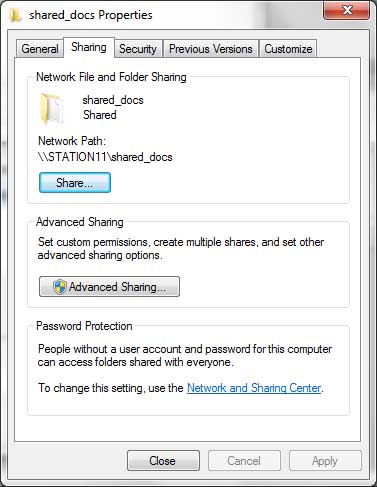
Open Windows Explorer, navigate to the folder on your Win7 machine that you want to share on the network and right-click it. Go Properties > Sharing Tab > Advanced Sharing > Share this folder > click Apply and OK > Close. (See screenshots below.)
|
||
  |
| File sharing in Windows 7 (ABOVE)-- Here are the control screens for file and printer sharing in Windows 7. These are the settings to allow file and print sharing on a peer-to-peer network.. |
  |
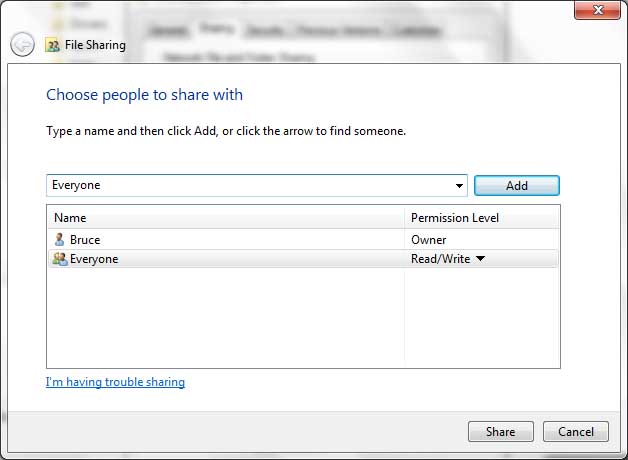 |
| File sharing in Windows 7 (ABOVE)-- In Windows Explorer (as opposed to Control Panel, as in the screenshots ABOVE) When you left-click on a folder > Properties, these are the General and Sharing Tabs (TOP LEFT & RIGHT). The Share button on the Sharing Tab gets you to the LOWER screenshot, where you must enter "Everyone" (without quotation marks) as a group and assign the level of access you want. |
|
Start with the Windows Firewall on your Windows XP machine. Go to Control Panel > Security Center > Windows Firewall > General Tab. On the General Tab there is a toggle that turns the Windows Firewall On and Off (see screen shots below). Now turn off your McAfee Security Center or Norton 360 firewall. In McAfee Security Center, click on Internet and Network in the main pane, then Configure toward the bottom right of the screen. Click Off in the top heading under Internet & Network Configuration, called "Firewall protection is enabled" (see screenshot below).
Turning Off your Windows Windows XP firewall -- In Windows XP, go to Control Panel > Security Center > Windows Firewall. The General Tab shown in the screenshot above shows the Windows Firewall turned Off. |
Get your FREE Kindle
|
 |

|
| Configuring Windows Firewall in Windows XP to allow wireless network traffic -- go to Control Panel > Security Center > Windows Firewall. On the General Tab (ABOVE RIGHT) turn Windows Firewall ON. Then go to the Advanced Tab and uncheck the box next to "1394 Connection." | |
 |
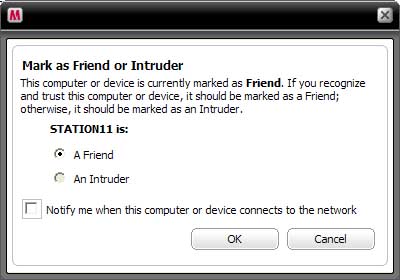 |
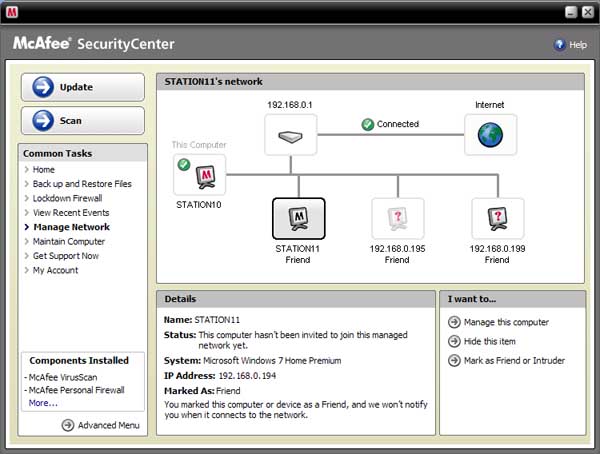
| Configuring McAfee Security Center Network in Windows XP -- In McAfee Security Center under Manage Network, you can designate another machine on the wireless network as a Friend or Intruder, and also . | |
|
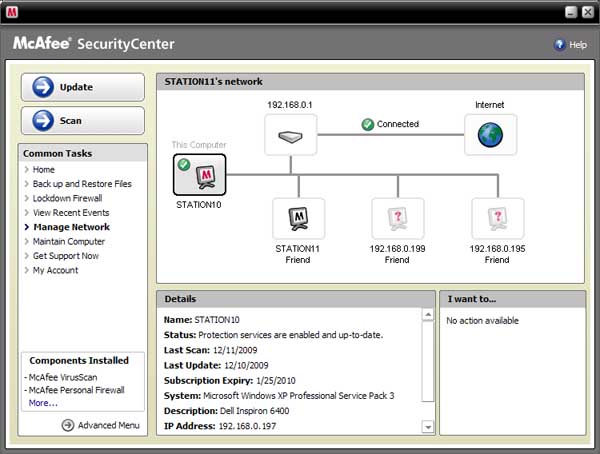
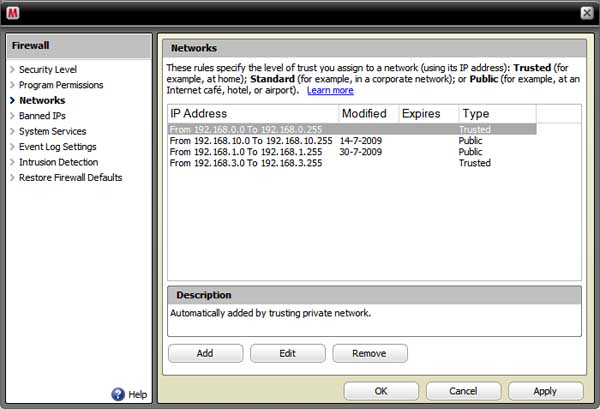
Still in McAfee Security Center, click one of the machines on your network or your router (see screenshot below) to see the numerical IP range used by your home network. Note the numerical IP of the machine (last item in info box at the bottom of the screen). Now go back to Security Center Home and click Firewall > Networks. Make sure the numerical IP you just noted is within the range of one of the "Trusted" IP's on the IP Address List. Change the IP to to Trusted if it isn't designated that way. |
||
 |
 |
| Configuring McAfee Security Center Firewall in Windows XP -- In McAfee Security Center under Manage Network, you can get the IP address of your network hub and various machines on the network (ABOVE LEFT). Go to Security Center > Manage Network and highlight the machine on which you want info. With the IP address in hand, go McAfee Security Center > Internet & Network > Firewall Protection is enabled > Advanced > System Services and confirm that your wireless home network's numerical IP range is listed as Trusted (screenshot at RIGHT). | |
|
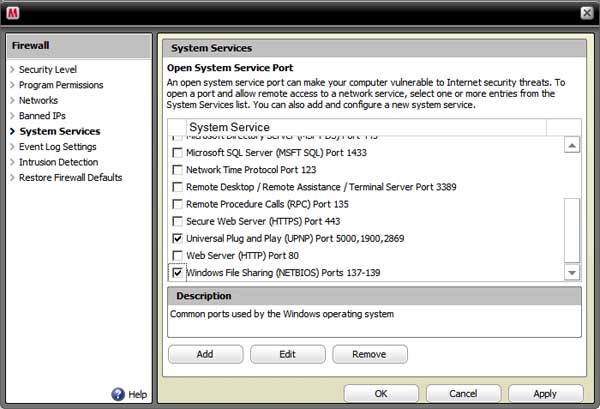
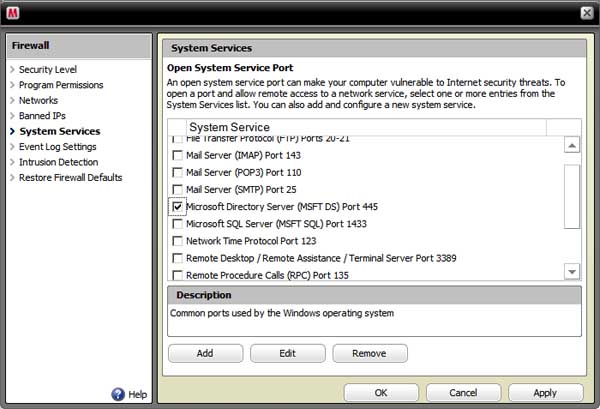
Next, go to McAfee Security Center > Internet and Network. Click the Configure button to the right and below the services in "Internet and Network." In the next screen, to the right of Internet and Network Configuration, click the radio button, "Firewall Protection is Enabled," reactivating your McAfee Firewall. Now click the Advanced button. On the left of the next screen, click System Services. Now you see a list of ports. Make sure the boxes are checked next to Windows File Sharing System (NETBIOS) ports 137-139 and Microsoft Directory Server (MSFT) port 445, meaning these ports are opened for network traffic. Click Apply > OK (see screenshots below). |
 |
|
 |
 |
| Configuring McAfee Security Center Firewall in Windows XP -- In McAfee Security Center under Firewall > Networks, go to go to System Service and make sure the boxes are checked next to Windows File Sharing System (NETBIOS) ports 137-139 and Microsoft Directory Server (MSFT) port 445, meaning these ports are opened for network traffic. | |
|
Norton 360 users need to do the same. In Norton 360, click Task and Settings > Change Advanced Settings > Firewall Protection Settings > Network Location. Check to see if your network location (numerical IP) is listed as Limited. If it is, change it to Trusted. Norton 360 users may also have to open ports 137-139 and 445 Windows File Sharing and Windows Directory Server respectively, as discussed for McAfee Security Center above.
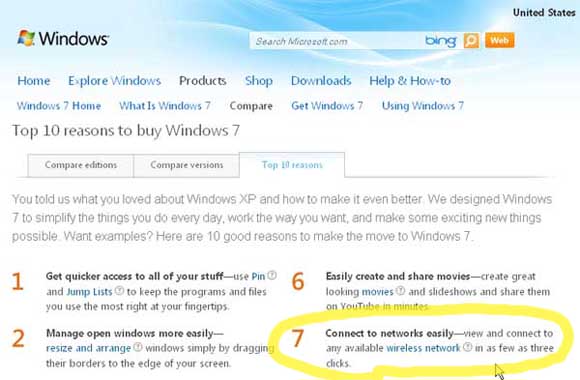
So how's that for the "easy" wireless network setup Microsoft promised in its glossy advertisements? Here's another screenshot from Microsoft.com. It claims that Windows 7 enables you to "view and connect to any available wireless network in as few as three clicks." I haven't done a complete count of the actual, real world Windows 7 / Windows XP network setup procedures outlined above, but the actual number of clicks required to set up peer-to-peer networking between Windows 7 and the rest of the Windows world can be closer to 300 clicks than three! -- Bruce Brown P.S. If you still can't get your Windows 7 and Windows XP machines to get it together on your wireless home network, click here... Deceptive advertising by Microsoft for Windows 7 -- Microsoft claims Windows 7 let you "connect to networks easily -- view and connect to any available wireless network in as few as three clicks" (circled in screen shot ABOVE). As this article demonstrates, it takes closer to 300 clicks to connect a Windows 7 Home Premium PC to a Windows XP Pro computer, the most common networking environment in which Windows 7 users will find themselves. What to do if the #$@&* machines still won't network... IF YOU still can't get your Windows 7 and Windows XP machines to connect on your wireless home network after following the Nine-Step Checklist, there are a couple more things you can try. If you have McAfee Security Center installed, go to the main screen, click Manage Network (in the list on left), then click the icon for the Windows 7 PC you're trying to network with. If it's status is listed as Managed, change it to Unmanaged (or vice versa -- the toggle is in the lower right hand corner of the screen), then rebbot and try to browse the other machine with Windows Explorer again. You can also try connecting the Windows 7 and Windows XP machines via numerical IP. If you have McAfee Security Center, go Manage Network. There you'll see the IP for your router, which defines the IP range that your home network uses. If you highlight the computer(s) on the wireless network -- including the one you're on -- you'll see the numerical IP for that machine. If you don't have a program like McAfee Security Center to reveal the numerical IP's to you, you can get each machine's numerical IP by opening a DOS box, typing "ipconfig" (without the quotation marks) at the DOS prompt and hitting Enter, as detailed in this video for Windows Vista (works pretty much the same in XP and Win7). Now go Start > Run (on XP) or Start > Search box (Win7), type //191.168.1.197 (replace this number with the numerical IP of the machine you want to network with) and hit Enter. If that works, you can use that address in your shortcuts, etc., but you also know you've got a problem in your TCP/IP which needs looking at. If you're still getting error code 0x80070035, it could be that NETBIOS isn't enabled over TCP/IP in Windows. Here's a Microsoft Knowledge Base article that addresses this sweet possibility. -- B.B.
© Copyright 1973 - 2020 by Bruce Brown and BF Communications Inc. Astonisher and Astonisher.com BF Communications Inc. Website by Running Dog |
|
||||||||